

Databricks recently introduced Free Edition, which opened the door for us to create a free hands-on course on MLOps with Databricks.
This article is part of that course series, where we walk through the tools, patterns, and best practices for building and deploying machine learning workflows on Databricks.
This is lecture 6 (out of 10). Let’s dive into deploying model serving endpoints and implementing A/B testing on Databricks. You can also follow along with the full walkthrough on the Marvelous MLOps YouTube channel.
In previous lectures, you learned how to train, log, and register models with MLflow. Now, it’s time to expose those models behind an API using Databricks Model Serving.
Databricks Model Serving is a fully managed, serverless solution that allows you to deploy MLflow models as RESTful APIs without the need to set up or manage any infrastructure.
Effortless deployment of registered MLflow models
Automatic scaling, including scale-to-zero when there’s no traffic
Built-in monitoring in the Databricks UI (track latency, throughput, error rates)
Seamless integration with models registered in Unity Catalog
Model serving limitations
Databricks model serving makes the transition from experimentation to production incredibly smooth. It’s ideal for teams who want to focus on building great models, not managing infrastructure. However, if you choose to deploy a model serving endpoint on Databricks, you must be aware of its limitations, such as:
No control over runtime environment: Databricks chooses the environment for you, which can be a constraint if you need specific library versions.
No control over cluster size. Each replica is limited to 4 GB RAM (CPU), which may not be enough for very large models.
Workload size options: You can choose the workload size (Small, Medium, Large, XL, etc.), which determines the number of compute units per replica. For demanding use cases, you can scale up to 512 units per endpoint on request.
The workload size determines the number of compute units available, with each unit able to handle one request at a time (4 for Small, 8–16 for Medium, 16–64 for Large). This does not directly translate to queries per second (QPS), as throughput depends on the execution time of the model’s predict function. For example, if prediction takes 20 ms, 4 compute units can handle approximately 4 / 0.02 = 200 QPS.
Autoscaling is based on the number of required units, not CPU or RAM usage. The number of required units is calculated as:
Required units = Queries per second × Model Processing Time (in seconds).
Example: 1,000 QPS × 0.02s = 20 units needed.
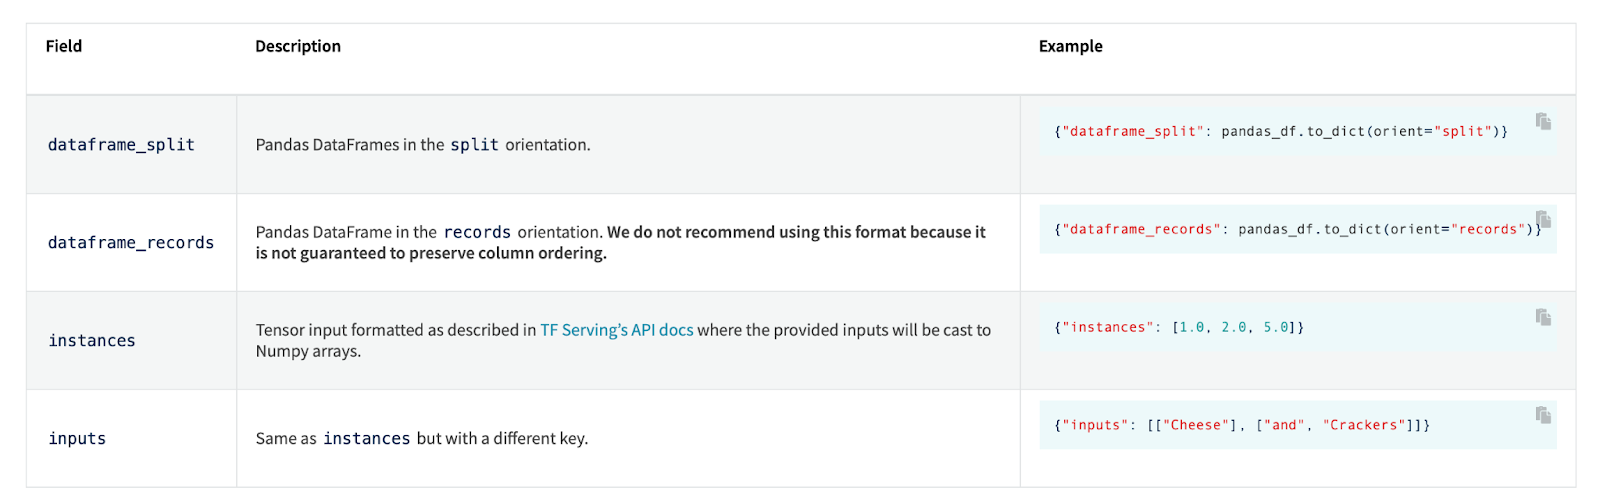
Payload structure
Another serving limitation is the payload structure. Databricks uses MLflow serving behind the scenes, and the payload is defined by it. You have some ability to adapt the payload for your needs by using pyfunc, but you have no influence on the global payload structure.
This is not ideal if you already have existing integrations, and want to migrate to Databricks model serving.
Model deployment
Let’s go through notebooks/lecture6.deploy_model_serving_endpoint.py notebook. You can find the code repository here.
Before we proceed with the model deployment, we need to authenticate with Databricks and set up our environment (the details on authentication are covered in lecture 2). The code supports both running inside Databricks and running locally (e.g., from VS Code). Authentication details are loaded from environment variables or the .env file, ensuring a smooth developer experience for teams.
We also define the DBR_TOKEN and DBR_HOST environment variables, which will be used later to send requests to the deployed endpoint.
from databricks.sdk import WorkspaceClient
import os
from dotenv import load_dotenv
import mlflow
from marvel_characters.utils import is_databricks

w = WorkspaceClient()
os.environ["DBR_HOST"] = w.config.host
os.environ["DBR_TOKEN"] = w.tokens.create(lifetime_seconds=1200).token_value

if not is_databricks():
    load_dotenv()
    profile = os.environ["PROFILE"]
    mlflow.set_tracking_uri(f"databricks://{profile}")
    mlflow.set_registry_uri(f"databricks-uc://{profile}")
The deployment leverages a custom ModelServing utility that wraps Databricks Model Serving APIs. Here’s how you deploy or update the endpoint:
from marvel_characters.serving.model_serving import ModelServing

model_serving = ModelServing(
    model_name=f"{catalog_name}.{schema_name}.marvel_character_model_custom",
    endpoint_name="marvel-character-model-serving"
)

model_serving.deploy_or_update_serving_endpoint()
Let’s take a look how the ModelServing class and the deploy_or_update_serving_endpoint() method look like. Essentially, it is a wrapper around Databricks sdk, where we take the latest registered model by the latest-model alias, and use it to create or update the endpoint if it already exists.
import mlflow
from databricks.sdk import WorkspaceClient
from databricks.sdk.service.serving import (
    EndpointCoreConfigInput,
    ServedEntityInput,
)


class ModelServing:
    """Manages model serving in Databricks for Marvel characters."""

    def __init__(self, model_name: str, endpoint_name: str) -> None:
        """Initialize the Model Serving Manager.
        """
        self.workspace = WorkspaceClient()
        self.endpoint_name = endpoint_name
        self.model_name = model_name

    def get_latest_model_version(self) -> str:
        """Retrieve the latest version of the model.
        """
        client = mlflow.MlflowClient()
        latest_version = client.get_model_version_by_alias(self.model_name, alias="latest-model").version
        print(f"Latest model version: {latest_version}")
        return latest_version
    def deploy_or_update_serving_endpoint(
        self, version: str = "latest", workload_size: str = "Small", scale_to_zero: bool = True
    ) -> None:
        """Deploy or update the model serving endpoint in Databricks for Marvel characters.
        """
        endpoint_exists = any(item.name == self.endpoint_name for item in self.workspace.serving_endpoints.list())
        entity_version = self.get_latest_model_version() if version == "latest" else version

        served_entities = [
            ServedEntityInput(
                entity_name=self.model_name,
                scale_to_zero_enabled=scale_to_zero,
                workload_size=workload_size,
                entity_version=entity_version,
            )
        ]

        if not endpoint_exists:
            self.workspace.serving_endpoints.create(
                name=self.endpoint_name,
                config=EndpointCoreConfigInput(
                    served_entities=served_entities,
                ),
            )
        else:
      self.workspace.serving_endpoints.update_config(name=self.endpoint_name, served_entities=served_entities)
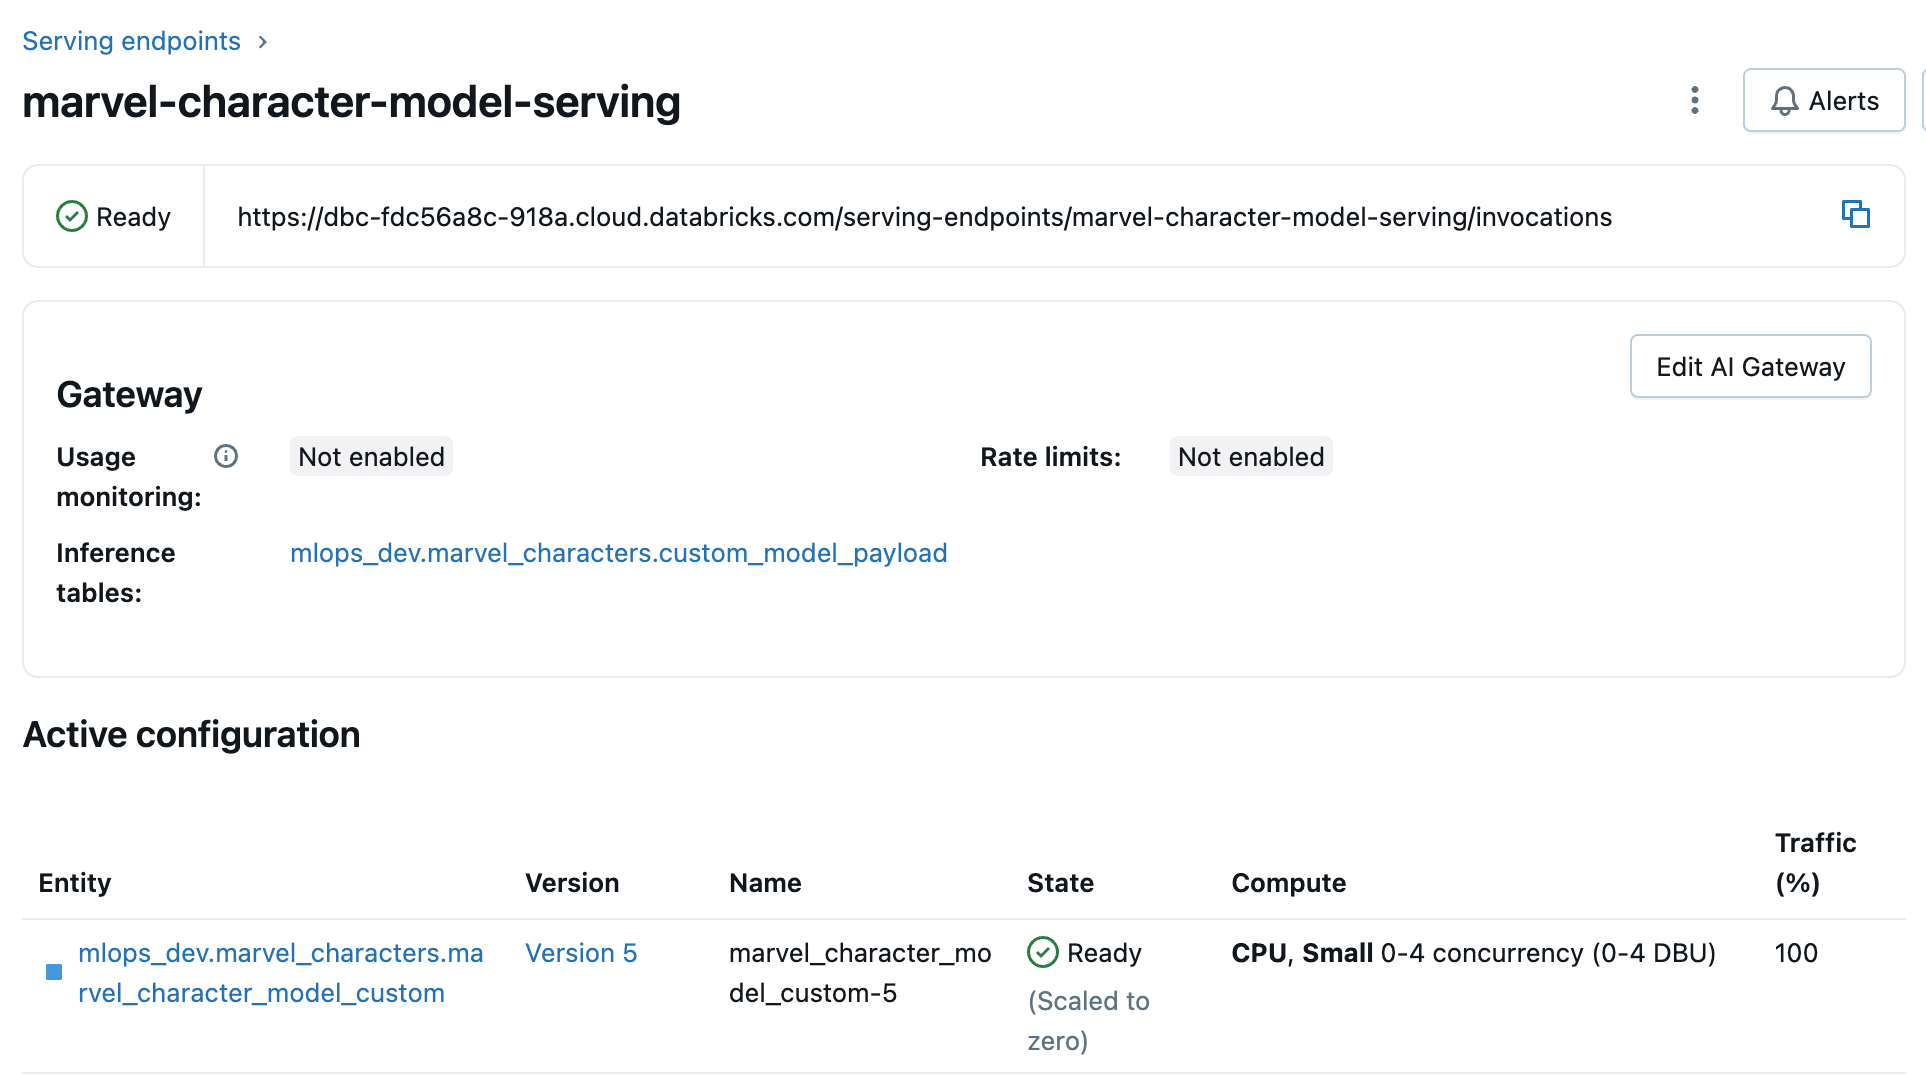
After the endpoint is deployed, we can view it in the workspace UI:
Making Predictions
After deployment, you can send prediction requests to your endpoint. The code demonstrates how to sample records from your test set, format them as JSON, and call the endpoint using Python’s requests library:
import requests

def call_endpoint(record):
    """
    Calls the model serving endpoint with a given input record.
    """
    serving_endpoint = f"{os.environ['DBR_HOST']}/serving-endpoints/marvel-character-model-serving/invocations"

    print(f"Calling endpoint: {serving_endpoint}")

    response = requests.post(
        serving_endpoint,
        headers={"Authorization": f"Bearer {os.environ['DBR_TOKEN']}"},
        json={"dataframe_records": record},
    )
    return response.status_code, response.text

sampled_records = test_set[required_columns].sample(n=18000, replace=True)
sampled_records = sampled_records.replace({np.nan: None}).to_dict(orient="records")

dataframe_records = [[record] for record in sampled_records]

status_code, response_text = call_endpoint(dataframe_records[0])
This enables you to validate your endpoint with real data and integrate it into downstream applications.
A/B Testing with Databricks Model Serving
Serving a single model is great, but how do you compare two models in production? A/B testing is a critical technique for continuous improvement and experimentation.
Databricks supports traffic split, by defining the list of served entities and percentage of traffic that goes to these entities. A common misconception is that simply splitting traffic between model versions qualifies as A/B testing but that’s not accurate. True A/B testing requires that a customer consistently sees the same model version throughout the experiment. This consistency is critical for accurately measuring performance differences (click-through rate, conversion, etc.).
Naive traffic split (like Databricks’ built-in routing) doesn’t guarantee this. A user might hit model A on one request and model B on the next. Sticky assignment is needed: Assign each user to a model variant based on a stable identifier (e.g., user ID or session ID), so they always get the same model during the test.
Let’s demonstrate how this can be implemented.
In the notebook notebooks/lecture6.ab_testing.py, we train two different models (A and B), each with its own configuration or hyperparameters:
from marvel_characters.models.basic_model import BasicModel

basic_model_a = BasicModel(config=config, tags=tags, spark=spark)
basic_model_a.train()

basic_model_a.log_model()

basic_model_a.register_model()

model_A_uri = f"models:/{basic_model_a.model_name}@latest-model"

basic_model_b = BasicModel(config=config, tags=tags, spark=spark)

basic_model_b.parameters = {"learning_rate": 0.01, "n_estimators": 1000, "max_depth": 6}

basic_model_b.model_name = f"{catalog_name}.{schema_name}.marvel_character_model_basic_B"

basic_model_b.train()

basic_model_b.log_model()

basic_model_b.register_model()

model_B_uri = f"models:/{basic_model_b.model_name}@latest-model"
Then, we define a custom MLflow PyFunc model (MarvelModelWrapper) to route requests to Model A or Model B based on a hash of a unique identifier (e.g., Id). This ensures a consistent split for reproducibility:
import hashlib

class MarvelModelWrapper(mlflow.pyfunc.PythonModel):

   def load_context(self, context):
      self.model_a = mlflow.sklearn.load_model(context.artifacts["sklearn-pipeline-model-A"])
      self.model_b = mlflow.sklearn.load_model(context.artifacts["sklearn-pipeline-model-B"])
      def predict(self, context, model_input):
      page_id = str(model_input["Id"].values[0])
      hashed_id = hashlib.md5(page_id.encode(encoding="UTF-8")).hexdigest()

      if int(hashed_id, 16) % 2:

          predictions = self.model_a.predict(model_input.drop(["Id"], axis=1))
          return {"Prediction": predictions[0], "model": "Model A"}

      else:
          predictions = self.model_b.predict(model_input.drop(["Id"], axis=1))
          return {"Prediction": predictions[0], "model": "Model B"}
The context must be passed at the model logging step (just as we did in lecture 4). Once the wrapper is registered and deployed in the same way we showed earlier, prediction requests are automatically split between the two models. You can monitor which model served each prediction and analyze results in the Databricks UI or programmatically.
Key Takeaways
In this lecture, we deployed our registered MLflow model to a Databricks Model Serving endpoint and exposed it as a REST API. We implemented a custom PyFunc wrapper to control the response payload and demonstrated how it can also be used for A/B testing by routing live traffic between different model versions.
Finally, we validated the endpoint in real time, showing how this approach supports experimentation while keeping deployment fast and reproducible.
With this setup, our model is not only live but also ready for iterative improvements in production.